Posts

Image Component Customization - Image Size Restriction - Drag/Drop - Touch UI
Image
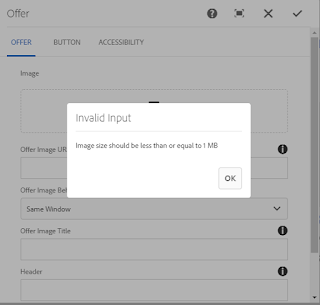
Customization of Image component or file upload resource type drag and drop from content/asset finder and restrict it to 1 MB or to any size. Step 1 : Create a AEM Image Component or use file upload resource type to drag and drop images in Touch UI dialog. Step 2 : Create Client library in your project application structure or inside component. Use categories as  cq.authoring.dialog or add extra clientlibs as needed . Step 3: Create a js file and add below piece of code which talks about file upload functions and accommodate for drag and drop behavior for coral classes from Content/Asset finder. As the page div for drag and drop creates on run time and becomes messy to retrieve the image size, hence a ajax call is used to get the image size post adapting resource to Asset. (function($, $document, ns) {     var FILE_UPLOAD_SELECTOR = ".cq-dialog .cq-FileUpload"; function imageSizeValidation(widget, elementName, imageSize, operation) {         if (widget &

AEM 6.3 | MSM Extended | JCR Properties Rollout

Image
AEM OOB excludes certain properties like jcr:title, jcr:description, cq:designPath  in live copy content rollout and  update . These properties are configured and controlled by O SGi configuration and can be modified accordingly.  Step 1 : Go to Configuration Manager Search for CQ MSM Content Update Action Step 2 : Open the OSGI configuration and it is as below snapshot. com.day.cq.wcm.msm.impl.actions.ContentUpdateActionFactory Step 3 : Override in application level OSGi folders(runmodes) as below. com.day.cq.wcm.msm.impl.actions.ContentUpdateActionFactory.config and do the modifications as needed in  Excluded Page Properties . Ex: By default  jcr:.* is excluded and if a requirement is to e nable jcr title and description, we have below expression to be  jcr:(?!(title|description)$).*                      Step 4: Content ready for Rollout.

AEM 6.3 | Apache Sling Content Disposition Filter | Hosting Static HTML in JCR

Image
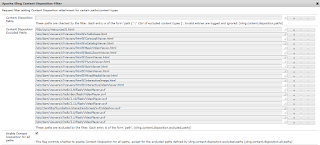
In AEM 6.2 and 6.3, when we attempt to hit the static content such as (/content/site/static-page.html), it is treated as a binary download and does the same for all other file types(pdf,css, js, images) where r esponse header shows Content-Disposition as an attachment. In previous versions of AEM (6.1 and below),  com.day.cq.dam.core.impl.servlet.SafeBinaryGetServlet  was there to control response header to render page instead of download.  However from 6.2, this component is  deprecated and t he reason is Apache Sling Content Disposition Filter(org.apache.sling.security.impl.ContentDispositionFilter) took precedence and an intended change made in product from AEM 6.2 onward and was introduced as part of Sling Security Fix. Here we have steps to render static pages: Apache Sling Content Disposition Filter Configuration where static files needs to be added to meet requirements. Configuration can be reverted back to render static pages without adding it manually in OSGI by u

AEM 6.3 Environment Indicator | ACS AEM Commons

Image
ACS AEM Commons provides a feature to indicate AEM author and publish environment like Local, Dev, QA or Staging on browser tab. This is a indicator which differentiates between multiple environment and different wcm modes. How to Start: Step 1 : AEM 6.3 start window. Step 2 : Go to felix console, search for AEM Environment indicator. Step 3 : Provide the value in Browser title field according to environments. i.e  Dev, Stage, Pre-Prod, Prod. Step 4 : This also provides feature to differentiate between run modes i.e preview, disabled. Provide the values in excluded wcm modes in configuration as shown in snapshot below. Reference: https://adobe-consulting-services.github.io/acs-aem-commons/features/environment-indicator/index..html

Disable OSGI Components & Bundles as part of Application Configuration

Image
ACS AEM Commons OSGI Bundle and Component Disabler config allows to shut-down OSGI Components and Services by configuration. This feature allows OSGI Bundles and Components to be disabled as part of application configuration and these can be well managed for different environments using run modes config. OSGI Component Disabler: Define a sling:OsgiConfig under project config node: Ex:  /apps/poc/config/com.adobe.acs.commons.util.impl.ComponentDisabler <?xml version="1.0" encoding="UTF-8"?> <jcr:root xmlns:sling=" http://sling.apache.org/jcr/sling/1.0 " xmlns:cq=" http://www.day.com/jcr/cq/1.0 " xmlns:jcr=" http://www.jcp.org/jcr/1.0 " xmlns:nt=" http://www.jcp.org/jcr/nt/1.0 " jcr:primaryType="sling:OsgiConfig" components="[pid1,pid2]" /> Snapshots below for reference: Components would be an array of the OSGI component PIDs to disable. CRX and OSGI view of component

AEM DataSource for Touch UI Drop Down based on component configuration.

Image
Here is Step by Step procedure to create dynamic drop down for Touch UI based on configuration from multi field component. Step 1 : Create a multifield component from OOB widget provided by Granite library as simple as using text and value fields using text field widget. sling:resourceType : granite/ui/components/foundation/form/multifield Step 2 . Create a component which would have a touch ui dialog with below node. Create a node with nt:unstructured having below property. sling:resourceType :granite/ui/components/foundation/form/select.  Next node would be datsource using sling:resourceType with sling servlet defined with path. Step 3 : Create a sling servlet as below definition. @Component(service = Servlet.class, property = { Constants.SERVICE_DESCRIPTION + "= Service to get drop down list", "sling.servlet.methods=" + HttpConstants.METHOD_GET, "sling.servlet.paths=" + "/apps/comp/getDropDownList" })

Configure Multi Site Management

Image
MSM - Multi Site Management is a configurable framework for automating content deployment. It works on Language master and blueprint model.  Let's discuss about  how   MSM Rollout configuration works. Step 1 : Go to site landing page Properties where Blueprint and Live Copy tabs are a part of dialog. Language master will have Blueprint active tab and Live Copy tab disabled. Step 2 : Go to Tools section and navigate to MSM folder.  Roll out  Configurations are done here. Step 3 : Open any Rollout Config and edit settings.It will have synchronization trigger based on drop down selection which is on rollout of page, on modification of content, on page activation and on page deactivation. Step 4 : Set up MSM Control center. Under tools section, select MSM Control Center folder where blueprint being set up. . Step 5 : Set up blueprint for language master.Select root path of language master from where content needs to be rollout. Step 6 : Open